Two drawings side by side on large backing board
Crowns in mixed greens but not totally identical - wet on dry
Closer view of first one done and yellow green underneath
Added a bead wash of transparent pyrrol orange + gamboge
More paint: Permanent red by DaVinci
Continuing on down adding Grumbacher true red, permanent rose
First berry finished with thalo yellow green at bottom
Second berry at the crown with small amount quinacridone gold
Adding pink and reds very wetly
More permanent red, plus colors above
Finished berry - water spritzed onto it and gamboge splatters
Side by side views
Background mix of UB, cobalt, permanent rose, arylide; one diagonal blue gingham square
More squares with Prussian, cobalt teal blue, mixed purples
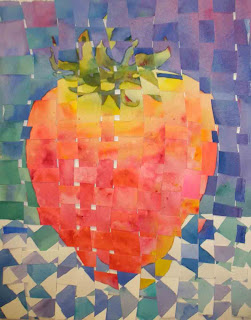
Both strawberries completed! Close but not identical
Cut one into vertical strips then horizontal 3/4 to 1" in width, with slight wavy lines
Weaving begun at top of vertical image
Continuing on downwards
The left one is now the only one with 3 strips left over that I'll save in the collage bin!
The left one is now the only one with 3 strips left over that I'll save in the collage bin!
Enjoy if you try this technique, just give it a go! NOTE: Update! See new post on weaving tulips for April/May 2015 here


8 comments:
I love it!! so original!! im going to try.. :) thanks for sharing, happy weekend!
I've shared on my blog, I hope you don't mind .. :)
Looks perfect, Kay...thanks for the very easy to follow instructions. Love all that riot of color in the berries.
Thank you Mari and Mollie! I appreciate your sharing of this idea, Mari.
Qué original!!! gracias por la explicación para poder aprender. Visitaré tu blog con más detalle (e intentaré traducirlo), he visto unos girasoles y amapolas preciosas.
Que manos tienes, que manera de pintar, que maravilla ver lo que he visto, me encanta. TODAS LAS FELICITACIONES SON POCAS PARA LO QUE TE MERECES.
Interesante técnica y excelente resultado.
Me ha encantado.
Fantastic and fun. Thanks. Yours is beautiful.
Post a Comment